
As a red-blooded American, I have done all manner of grilling throughout the years – charcoal, gas, red meat, white meat, fish, vegetables, etc. Cracking open a cold one and starting up some charcoal is one of my favorite things to do in life. However, one thing that I am just recently getting into is using a Himalayan salt block on the grill. With the correct type of meat, the salt block can really enhance the flavor of the meat, and actually make the whole grilling process simpler if it is done correctly.
Today, I will share a few tricks I have learned through trial and error, along with a couple photos from my most recent salt block experience. First though, a little background on Himalayan salt blocks.
What is a Himalayan Salt Block?
Himalayan salt rock is a pink salt mined in Pakistan. It has multiple uses. It can be used to make bath salts, and there are also lamps for ambient lighting that are made out of Himalayan salt.
My favorite use though is salt blocks which are used for cooking and serving food. The salt stones work great for both stove top cooking as well as grilling. The properties of the stone allow it to retain heat for a very long time. The stone also seasons the meat as it cooks.
Why Grill With Salt Blocks?
The great thing about using a salt block is that it really kicks up the flavor of the meat by itself. I love marinades, but do not always have time to make them. The other problem is that oftentimes I decide during the work day that it is a beautiful day and I want to fire up the charcoal when I get home. That is all well and good, but obviously does not allow for an overnight marinade.
With the salt block, you get amazing flavor that does not overpower your dish it makes it possible to do everything from grocery buying to preparation and cooking after a long day of work. No major planning necessary!
The other nice thing about using a Himalayan salt block is that the entire process is very simple. Still, there are a few important things to keep in mind, which I will share with you now by going through the steps one at a time. Please bear in mind these instructions are for a charcoal grill. The steps are slightly different if you are using a gas grill.
How to Grill With a Salt Block
Step One: Prepare and Heat the Salt Block
If it is a brand new stone, it is ready to go out of the box. However, if you have used it already, it is important to always keep the same side face up, as a grilling or cooking surface. The reason is that the block heating process takes a toll on the stone, and the integrity of the stone can start to break down faster if both sides are used as the cooking surface.
The other important thing to remember when you get the grill ready is that the block needs to heat up gradually, again to protect the integrity of the stone. The good news is, this is very easily done. First, make sure all of the coals are on one side of the grill. Get the coals started, put the grate on and place the stone on the other side of the grill right away before the coals are up to temperature, like this (although in retrospect, I will use more coals next time):
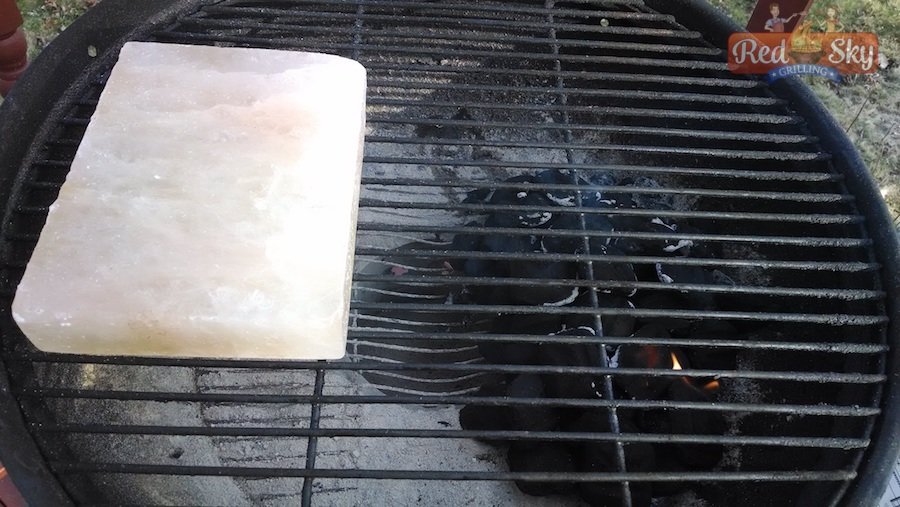
Place the salt block on the grill as the coals warm up, but do not place it directly over the heat.
While using a salt stone is very straightforward, it does require a little patience. Since the block needs to be warmed gradually, yet needs to be hot to be used as a cooking surface, a little time is necessary. I allowed the block to warm up for about 35 minutes. One of the ways you can tell it is starting to get up to temperature is that the block will start to darken, like this:
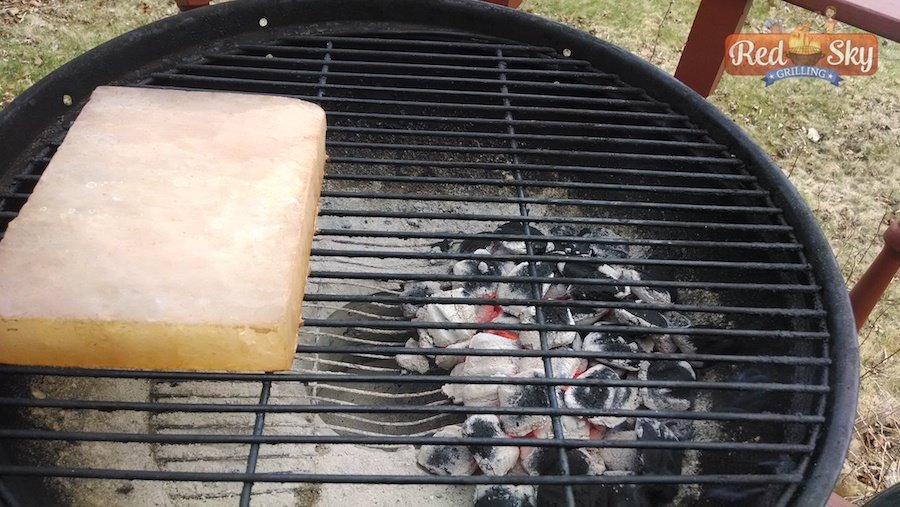
A tell-tale sign that the stone is getting up to temperature is that the stone color darkens.
The darker it gets, the hotter you know the block is. I have also read that you can use a small drop of water to test the heat. If it evaporates on contact you are good to go. Be careful though if you use this method. The block should not have any moisture when in use.
Step Two: Put the Meat on the Block
Once the block is ready, it is time for the meat to go on. Do not put any oil or grease on the salt stone itself. I went with salmon steaks on this particular occasion and coated them in a light amount of oil and pepper before placing them on the cooking surface. My salt block is not very big, so size-wise this proved to be a good choice:
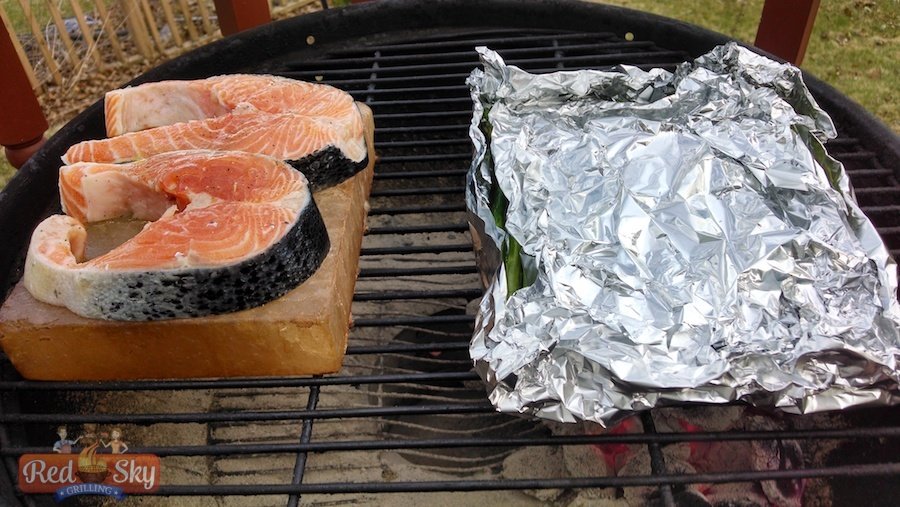
Thinner cuts of meat work very well on a salt stone.
As you can see above, the need for the block to be indirectly above the coals provides a cool benefit: Empty grate space to grill either a vegetable side or for a second type of meat. On this particular occasion I chose to fill the empty area with asparagus in foil, and sliced pineapple and small peppers a little later on. Being able to cook the main dish and sides all at the same time in the same place is the lazy grill master’s dream. Using a salt block makes doing this a breeze.
At this point, the cooking time needed obviously is dependent on what you choose to put on the salt block. I will say though that thin meats tend to work well. My salmon turned out, and flank steak and other similar cuts also end up great on the salt. Once my salmon was done on the first side, I flipped it and added the rest of my sides to the grill:
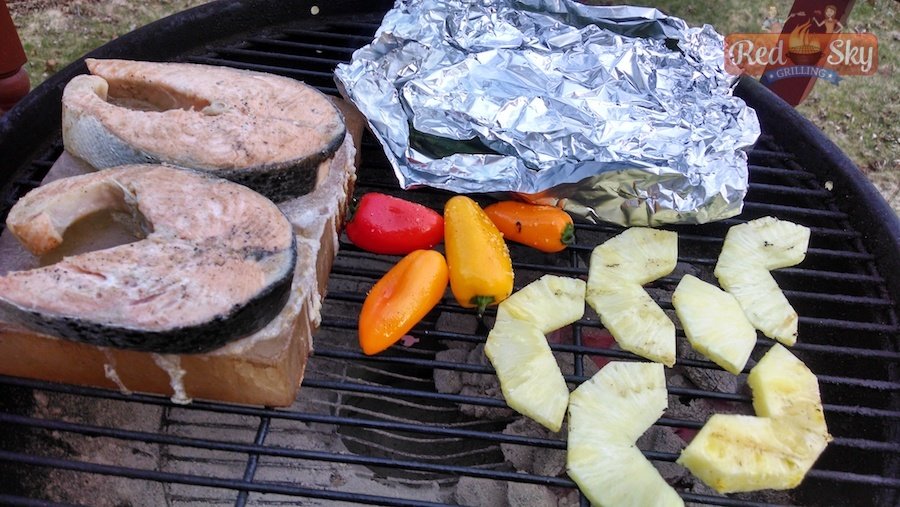
The (almost) finished product.
Step Three: Finish Cooking Meat and Cook Another Round if Necessary
From there, everything timed out to all get done at about the same time. One other cool feature with the salt stone is it has amazing heat retention. What that means is that even if the coals go out, you can still do some more cooking on the stone. When I am just cooking for myself and my wife, that is not a big deal, but when there is company over it is a very nice feature. If the first batch of meat is done but one of my slacker friends is running late to the cookout, I can simply shut the grill with the vent open, pop the top on another beer, and use the block once they finally show up.
Clean Up and Salt Block Maintenance
As anyone who has ever prepared a meal knows though, it is not all cooking, eating and drinking beer. The dreaded clean up follows even the greatest of meals. The good news is that cleaning the salt block is a snap. Do not forget though, the stone retains heat for a long time. When I am done cooking on it, as long as the weather is fine, I leave the cover off of the grill and let the salt block cool off. Give it plenty of time so you do not singe your hand.
Once it is cool to the touch, remove the block from the grill and wipe it down with a damp paper towel or sponge. That’s it! Do not use any sort of soap or other cleaning product as the soap will seep into the salt. It seems a bit unsanitary, but is safe due to the properties of the salt. The other thing to keep in mind is the block must be completely dry before it is used again, so once you clean it with water it will be out of commission for a while.
So there you have it! Himalayan salt blocks are simple to use and add great flavor to your grilled meats. Oh, and they are affordable too. As long as there is care taken when heating and cleaning them, the salt stone will last for several uses. If you want to add a new dimension to your grilling routine, pick one up today.